
As a big fan of open source software, I’m running my Android phone without Google’s Play Store. The only resource for apps I use is FDroid. And there are some really nice apps available. In this post I’ll show you how to install and setup a remote keyboard app that also includes clipboard management. And the best part: It does not require any special software!
Installation
There are many ways to install the app on your phone:
- Install it using one of the available markets. Remote Keyboard is available in the FDroid and in the Play Store.
- The FDroid store also offers a direct download link, so you don’t need to use an app store at all, if you don’t want to.
- Another way is of course to compile the source code yourself. While that can also be a fun way to spend ones time, I won’t go into more detail about this – at least not in this post.
Beside the app itself you’ll also need a telnet client on your computer – or better: on the device you want to connect. Since we need only a telnet client you could also use any other device: another phone or tablet, a DDWRT/OpenWRT router, a Linux driven satellite receiver.
While Windows XP by default shipped with a telnet client, Microsoft removed it in Windows 7 (or Vista if anyone wants to remember this one) and later versions. There is a well known solution for Windows: Just download the PuTTY Telnet Client. It’s available as an executable and doesn’t require installation.
Microsoft banned telnet for good reasons. Remember that a telnet session is not encrypted (unlike ssh for example)! For this reason you should not use this app in a network that you do not trust and never type in any password outside your own network. The app allows to set a password, but this password will pass the network in plain text and is not used to encrypt the text you are sending!
Just use your distributions packet manager to install a telnet client. If you’re running Gentoo Linux for example, you can install a client by running
# emerge telnet-bsd
This or a similar named package should be available in every linux distribution out there and maybe even installed by default.
Configuration
The app will direct you through the configuration process on your android device. You’ll have to enable the keyboard in the settings and then select it as input mode. After that the telnet server will be started automatically. The last thing you’ll have to do is finding out the IP address of your device. I attached a fixed IP to my phone via my router.
If you have the IP address, just connect to the device using your prefered telnet client. Remember to use port 2323 and not the standard telnet port 23:
# telnet 192.168.x.y 2323
Hit any key to connect. After that you should see the telnet frontend:
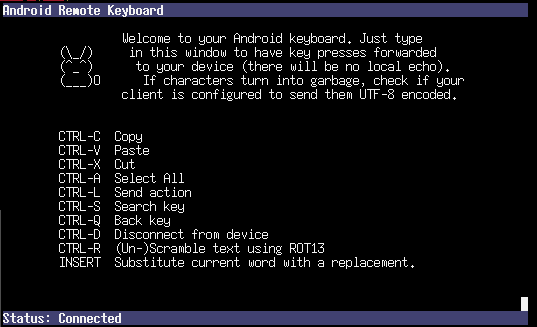
Now type into the telnet session and the letters (UTF-8 symbols work also) will appear in the selected text field on your android device. You can also use the arrow keys to navigate, but this is very limited, as the android user interface does not support this properly. The copy and paste function is also available now. Just copy a text on your computer and paste it to the telnet session. Or select and copy text on your phone and hit the keyboard button on the bottom right. The text will be pasted to your telnet session.